Showing posts with label clothing. Show all posts

Sunday, 11 November 2012

Hidden Mini Home Office - In An Ikea Besta Unit


Can you remember Big Unit? Well, we have now moved our home office-y type of things inside it. Like so...


This was born out of necessity really. We used to have a full room for an office space which housed a desk and all of my crafting things. I would craft in there and I would also work from home (before I was made redundant - boo!) Now obviously we don't need the office space for me to work at my now none existent job, and I haven't done any crafting in a looooooong time.

The room which was once the office is currently being cleared out to make way for the kids' things. Sigh. These blinking kids take over don't they?! :) More on that later though. I am sure I will let you know how that transformation goes.

So this is what the inside of this cupboard looked like only a couple of days ago.


AAAAAHHHH!!!! Does that make your eyes itch? It does mine.

The top shelf held some of the kiddos crafting supplies, and the bottom space was home to my husband's gibble. It was never really planned that way particularly. We just needed to put glue up high out of their reach and my dearest husband decided that he needed to put his deodorant on and his contact lenses in while standing at the Big Unit. As you do.

I cleared away all of that stuff and gave the shelves a good old clean. The crafting things are in a box in the old office just waiting to be re-homed somewhere more sensible, and my husband's gear has been stored somewhere more appropriate.

Here's what it looks like now!


Proud as punch I am! Let me go through everything with you.

Starting top left...


These drawers used to sit on my desk for crafting bits and pieces in. I bought them from Wilkinsons. Although I'm pretty sure they don't do these same ones anymore. However, they might do something similar.


Pretty AND functional. I keep my clips, pins, Tippex, date stamp, USB pens and blu take, etc in there. 


I made practical labels for my magazine files (from Ikea - Kassett i think). I had a huge stack of magazines in the cupboard opposite.


So I thinned them down, choosing only magazines dated within the last few months, or those with particular articles or tutorials I am interested in. 

The current projects file contains paperwork for whatever project we happen to be focusing on right now. Then the Address and Birthdays file has my birthdays book, my address book and any greetings cards I have waiting. There is one spare magazine file with nothing in it. I am sure it won't be empty for long though!

To the right of those are a few books and a super cute pen pot.


The pen pot was also from the Wilkinsons Nostalgia range of stationery supplies. I love that whole range, it's so pretty!


Guess where my family organiser calendar was from? Wilkinsons - you got it! Can you tell I love that shop, almost as much as I love Ikea? The calendar doesn't start until January and I need to go through it and add all the important dates, but for now, it just looks cute. I used a calendar hook from Wilkos too and it was really simple to stick on. The instructions said to wait 24 hours before hanging on it, but I got excited and did it right away. It seems to be holding well. 
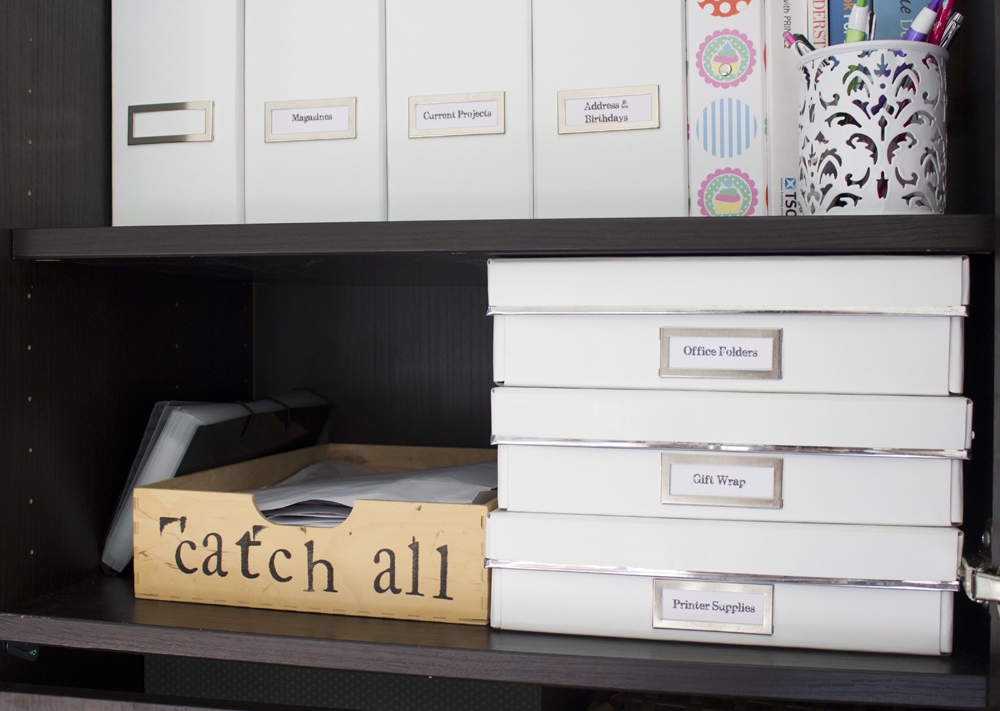

Okay, so here's the bottom shelf. The "catch all" box is where we throw all those things that you can't be bothered to deal with straight away. Previously everything used to land in two wicker baskets on the open shelving. That was okay, but it was too out in the open. I really need to keep that kind of thing hidden away. No one wants to be confronted by a display of take away menus, till receipts and wires when they come visiting. 


See? No one needs to be seeing that.


As you can see I am not too good at stamping, but I put the wording on here myself none the less. I am telling myself I kinda like the crazy, splodged look... 

The black folder you can see behind the box is where I keep receipts. I dump them all in here out of my purse and out of the catch-all box every now and again. Then periodically I will go through and throw away all the ones I no longer need. Neat!


Lastly, but by no means least. Here is where I keep my spare office folders (punched pockets, presentation folders, etc), my gift wrap supplies (sheet wrap, tags, tissue paper) and my printer supplies (ink, sheet labels, paper). 

And that concludes the tour of our shiny new hidden home office space. I know it's compact, but it works for us right now. 


And because i like em, here's a before and after...


Thanks so much for visiting me! 

I've linked up to these super parties:

Becolorful Sumo's Sweet Stuff My Uncommon Slice of Suburbia
Organize and Decorate Everything shabby creek cottageThe Shabby Nest

Making the World Cuter - Monday Link Up Party
Debbiedoos - Power of Pinterest Party
We Are That Family - Works For Me Wednesdays
New Nostalgia - Anti Procrastination Tuesdays
A Bowl Full Of Lemons - One Project at a Time
Adorned From Above - Wednesdays Link Party
The Artsygirl Connection - Pinspirational Thursdays
Between U & Me - Crazy Cute Link Party
30 Handmade Days - Friday Pity Party
Chic on a Shoestring Decorating - Flaunt It Friday
French Country Cottage - Feathered Nest Friday
It's a Hodgepodge Life - Hodgepodge Friday
It's Overflowing - Overflowing With Creativity
Positively Splendid - Saturday Seven Party
Too Much Time - Get Schooled Saturday
Lovely Crafty Home - Lovely Crafty Weekend
Funky Junk Interiors - SNS

Thursday, 3 March 2011

Wardrobe Decluttering


This is our mahooooosive wardrobe in our bedroom. It's from IKEA (naturally) and is part of their Pax range, which is brilliant for being able to pick and mix what kinds of storage features you want inside. Sorry, the photo is wonky, I must have been in a rush.

A couple of things I feel I have to mention here are, a) the general massiveness of the wardrobes and, b) the general ikkyness of this room.

a) The wardrobes are so big because I am an idiot. Basically, I have a natural instinct in me which screams "BUY BIG!" whenever we're getting something new. Remember the "Big Unit?" My idea. Anyway, it usually takes every ounce of control to moderate the size of anything I buy, particularly when it comes to storage items. My natural impulse is to get the biggest thing that will fit in the space so that we can hide as much of our stuff in there as possible. I am battling this ridiculous urge since it is far better to streamline the amount of stuff you actually own in order to possess smaller, more compact pieces of furniture that don't completely dominate the space.

When we bought these wardrobes I was very organised and cut out wardrobe (and bed and bedside cabinet) sized footprints from newspaper and spent ages working out where each thing would go. In the end, I decided that the wardrobes could go on this wall, adjacent to the door and that it didn't matter that the door can't fully open because look at all the room we have to hide our crap! Sigh. Fast forward to us having babies and now I curse having to squish myself in sideways while carrying a child in my arms! Silly, silly Sarah.

Soooo, part of my organising mission with these bad boys is for me to be able to condense all of the items into the two double wardrobes so that I can get rid of the single one on the end.

b) Our bedroom badly needs decorating, but is sadly right far down on the list of "things to spend our money on." Above that being a car, the garden, and the living room. This is why the walls are all marked and you can see a trendy red border around the top of the walls. We stripped the fabulous orange pine cladding from the ceiling and now enjoy staring at the bumpy contours of nail hole pocked woodchip. Jealous much?


Anyhoo, this photo shows the inside of the wardrobes before I tackled them. Not toooo bad you might think, but on closer examination, you can see why it doesn't work. There are loads of inefficient systems going on here - too many drawers versus hanging space, drawers containing things that need throwing out, wellies in drawers (!) and just a general need for some decluttering.


This is "after." The changes are subtle, but here's what I did...
- Removed two of the wire drawers from the middle section and utilised a second hanging rail that was already there, just unused.
- I went through and took out two bags of clothes to either sell on eBay or send it to charity.
- I removed some personal care items and put them in my bedside cabinet instead.
- Took out the wellies and rehoused elsewhere.
- Used the newly freed-up drawers in 'his' side to store the kid's clothes I am going to be listing on eBay.
- Organised my clothes into sections - jackets, cardis, dresses, tunics, shirts, jumpers, tops, jeans, trousers, leggings.

I do feel better for doing all that! :o)

Oh, and those two wire drawers i removed make brilliant underbed storage! Now i keep my handbags in one and a few random items including those wellies in the other.

I'm linking this post up to I'm An Organising Junkie's 52 Weeks of Organising:

Thursday, 10 February 2011

Nursery Storage Makeover


Huzzah!! The nursery cupboard/closet/wardrobe storage has finally been made over. Behind those doors lies a far more organised and space-efficient, erm, space. The only thing left to do is touch up the bits where the hinges for the old doors were.

Remember what it looked like before?


The louvre doors had been taken off by this point, but they were an awful shade of orange-brown the same as the trim seen here. Couldn't wait to get my tin 'o' white out!

So what was wrong with this space? Where do I start?!
1. It was dirty looking.
2. Not enough shelving.
3. Existing shelves stuck out too far and interfered with anything hanging on the rail.
4. The rail was dirty.
5. Wood parts were cakky orange-brown stained.
6. Doors were the same cakky orange.

So, the first thing we did was take out all of the shelving and reposition making better use of the space. We also added an extra shelf. All the shelves were cut down to a shallower depth, using the containers I am using as drawers as a guide. This left much more space in front for hanging clothes, which now hang on a shiny new chrome rail.

I painted the walls and ceiling with white emulsion and the wood parts with white eggshell. My husband made an excellent job of the doors I think and they look much cleaner and modern than the old louvre doors did. If I can find a photo of the old doors I'll post one later.

Once I'd battled through this pile of all his clothing and other wardrobe fillers...


I was ready to put things back in a more orderly fashion.


Ahhhh... Much better!

I also have a little (lot) more storage in the form of my trusty IKEA Expedit 2x2 unit. 


The boxes inside are "Skubb" and hold so much stuff it's unreal. We use them in the kid's toy storage Expedits downstairs too. 

Top left we have sleepsuits, rompers, and vests. 


Top right is his socks, shoes, dribble bibs, hats and swim things.


Now, because the Skubb boxes are so deep I've used the Skubb drawer dividers inside here to help layer up. Here's what I mean. Take one out and you can see his sleeping bags stored underneath.


The bottom right is trousers.


And the bottom left is another Skubb drawer divider holding his tops with knitwear and fitted sheets underneath.


Let's take another look at my his fab new cupboard...

Before & After


 I'm so proud! :o) Now I just need to put the rest of his hanging items up and we're done. Here's what's in there,

Top left - plastic box containing cloth nappy equipment not currently in use (spare inserts, too girly/big, etc.)
Top right - a plastic container with clothes that are too big right now.
Middle shelves - Green containers on sale for £1.49 each at Dunelm Mill. Clockwise from top left they house: nothing / empty (yey!), spare hangers, stock of baby wipes, spare nursery wallpaper borders.
Bottom shelf - 2 massive Skubb (recurring theme here?) containers with all the clothes that he no longer fits into, which I intend to go through and put on eBay. Sob!
Front - two out of three baskets I've had for ages. Nappies on the left, baby towels on the right.

If you liked this post you might be interested in these ones too:

Our Little Boy's Nursery
Wasted Space to Memo Place
Toy Organisation and Playroom Love
Hidden Mini Office in An IKEA Besta Unit
Master Bedroom Makeover


Related Posts Plugin for WordPress, Blogger...