

Can you remember Big Unit? Well, we have now moved our home office-y type of things inside it. Like so...

This was born out of necessity really. We used to have a full room for an office space which housed a desk and all of my crafting things. I would craft in there and I would also work from home (before I was made redundant - boo!) Now obviously we don't need the office space for me to work at my now none existent job, and I haven't done any crafting in a looooooong time.
The room which was once the office is currently being cleared out to make way for the kids' things. Sigh. These blinking kids take over don't they?! :) More on that later though. I am sure I will let you know how that transformation goes.
So this is what the inside of this cupboard looked like only a couple of days ago.

AAAAAHHHH!!!! Does that make your eyes itch? It does mine.
The top shelf held some of the kiddos crafting supplies, and the bottom space was home to my husband's gibble. It was never really planned that way particularly. We just needed to put glue up high out of their reach and my dearest husband decided that he needed to put his deodorant on and his contact lenses in while standing at the Big Unit. As you do.
I cleared away all of that stuff and gave the shelves a good old clean. The crafting things are in a box in the old office just waiting to be re-homed somewhere more sensible, and my husband's gear has been stored somewhere more appropriate.
Here's what it looks like now!

Proud as punch I am! Let me go through everything with you.
Starting top left...

These drawers used to sit on my desk for crafting bits and pieces in. I bought them from Wilkinsons. Although I'm pretty sure they don't do these same ones anymore. However, they might do something similar.

Pretty AND functional. I keep my clips, pins, Tippex, date stamp, USB pens and blu take, etc in there.

I made practical labels for my magazine files (from Ikea - Kassett i think). I had a huge stack of magazines in the cupboard opposite.

So I thinned them down, choosing only magazines dated within the last few months, or those with particular articles or tutorials I am interested in.
The current projects file contains paperwork for whatever project we happen to be focusing on right now. Then the Address and Birthdays file has my birthdays book, my address book and any greetings cards I have waiting. There is one spare magazine file with nothing in it. I am sure it won't be empty for long though!
To the right of those are a few books and a super cute pen pot.

The pen pot was also from the Wilkinsons Nostalgia range of stationery supplies. I love that whole range, it's so pretty!

Guess where my family organiser calendar was from? Wilkinsons - you got it! Can you tell I love that shop, almost as much as I love Ikea? The calendar doesn't start until January and I need to go through it and add all the important dates, but for now, it just looks cute. I used a calendar hook from Wilkos too and it was really simple to stick on. The instructions said to wait 24 hours before hanging on it, but I got excited and did it right away. It seems to be holding well.
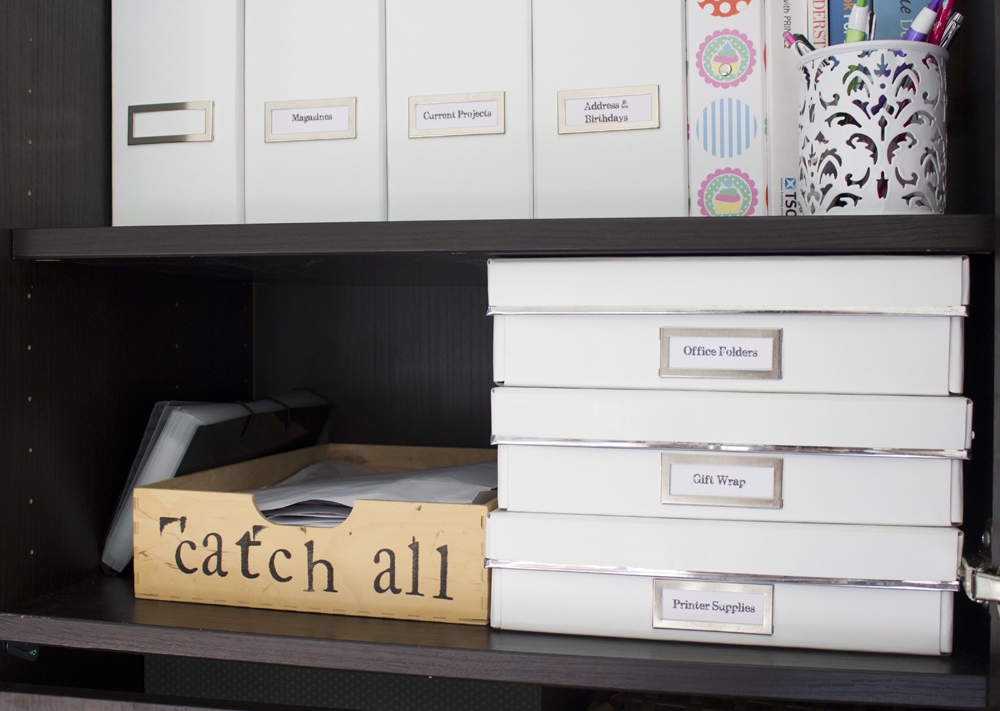
Okay, so here's the bottom shelf. The "catch all" box is where we throw all those things that you can't be bothered to deal with straight away. Previously everything used to land in two wicker baskets on the open shelving. That was okay, but it was too out in the open. I really need to keep that kind of thing hidden away. No one wants to be confronted by a display of take away menus, till receipts and wires when they come visiting.

See? No one needs to be seeing that.

As you can see I am not too good at stamping, but I put the wording on here myself none the less. I am telling myself I kinda like the crazy, splodged look...
The black folder you can see behind the box is where I keep receipts. I dump them all in here out of my purse and out of the catch-all box every now and again. Then periodically I will go through and throw away all the ones I no longer need. Neat!

Lastly, but by no means least. Here is where I keep my spare office folders (punched pockets, presentation folders, etc), my gift wrap supplies (sheet wrap, tags, tissue paper) and my printer supplies (ink, sheet labels, paper).
And that concludes the tour of our shiny new hidden home office space. I know it's compact, but it works for us right now.
And because i like em, here's a before and after...

Thanks so much for visiting me!
I've linked up to these super parties:
Making the World Cuter - Monday Link Up Party
Debbiedoos - Power of Pinterest Party
We Are That Family - Works For Me Wednesdays
New Nostalgia - Anti Procrastination Tuesdays
A Bowl Full Of Lemons - One Project at a Time
Adorned From Above - Wednesdays Link Party
The Artsygirl Connection - Pinspirational Thursdays
Between U & Me - Crazy Cute Link Party
30 Handmade Days - Friday Pity Party
Chic on a Shoestring Decorating - Flaunt It Friday
French Country Cottage - Feathered Nest Friday
It's a Hodgepodge Life - Hodgepodge Friday
It's Overflowing - Overflowing With Creativity
Positively Splendid - Saturday Seven Party
Too Much Time - Get Schooled Saturday
Lovely Crafty Home - Lovely Crafty Weekend
Funky Junk Interiors - SNS


