Sunday, 11 November 2012

Hidden Mini Home Office - In An Ikea Besta Unit


Can you remember Big Unit? Well, we have now moved our home office-y type of things inside it. Like so...


This was born out of necessity really. We used to have a full room for an office space which housed a desk and all of my crafting things. I would craft in there and I would also work from home (before I was made redundant - boo!) Now obviously we don't need the office space for me to work at my now none existent job, and I haven't done any crafting in a looooooong time.

The room which was once the office is currently being cleared out to make way for the kids' things. Sigh. These blinking kids take over don't they?! :) More on that later though. I am sure I will let you know how that transformation goes.

So this is what the inside of this cupboard looked like only a couple of days ago.


AAAAAHHHH!!!! Does that make your eyes itch? It does mine.

The top shelf held some of the kiddos crafting supplies, and the bottom space was home to my husband's gibble. It was never really planned that way particularly. We just needed to put glue up high out of their reach and my dearest husband decided that he needed to put his deodorant on and his contact lenses in while standing at the Big Unit. As you do.

I cleared away all of that stuff and gave the shelves a good old clean. The crafting things are in a box in the old office just waiting to be re-homed somewhere more sensible, and my husband's gear has been stored somewhere more appropriate.

Here's what it looks like now!


Proud as punch I am! Let me go through everything with you.

Starting top left...


These drawers used to sit on my desk for crafting bits and pieces in. I bought them from Wilkinsons. Although I'm pretty sure they don't do these same ones anymore. However, they might do something similar.


Pretty AND functional. I keep my clips, pins, Tippex, date stamp, USB pens and blu take, etc in there. 


I made practical labels for my magazine files (from Ikea - Kassett i think). I had a huge stack of magazines in the cupboard opposite.


So I thinned them down, choosing only magazines dated within the last few months, or those with particular articles or tutorials I am interested in. 

The current projects file contains paperwork for whatever project we happen to be focusing on right now. Then the Address and Birthdays file has my birthdays book, my address book and any greetings cards I have waiting. There is one spare magazine file with nothing in it. I am sure it won't be empty for long though!

To the right of those are a few books and a super cute pen pot.


The pen pot was also from the Wilkinsons Nostalgia range of stationery supplies. I love that whole range, it's so pretty!


Guess where my family organiser calendar was from? Wilkinsons - you got it! Can you tell I love that shop, almost as much as I love Ikea? The calendar doesn't start until January and I need to go through it and add all the important dates, but for now, it just looks cute. I used a calendar hook from Wilkos too and it was really simple to stick on. The instructions said to wait 24 hours before hanging on it, but I got excited and did it right away. It seems to be holding well. 
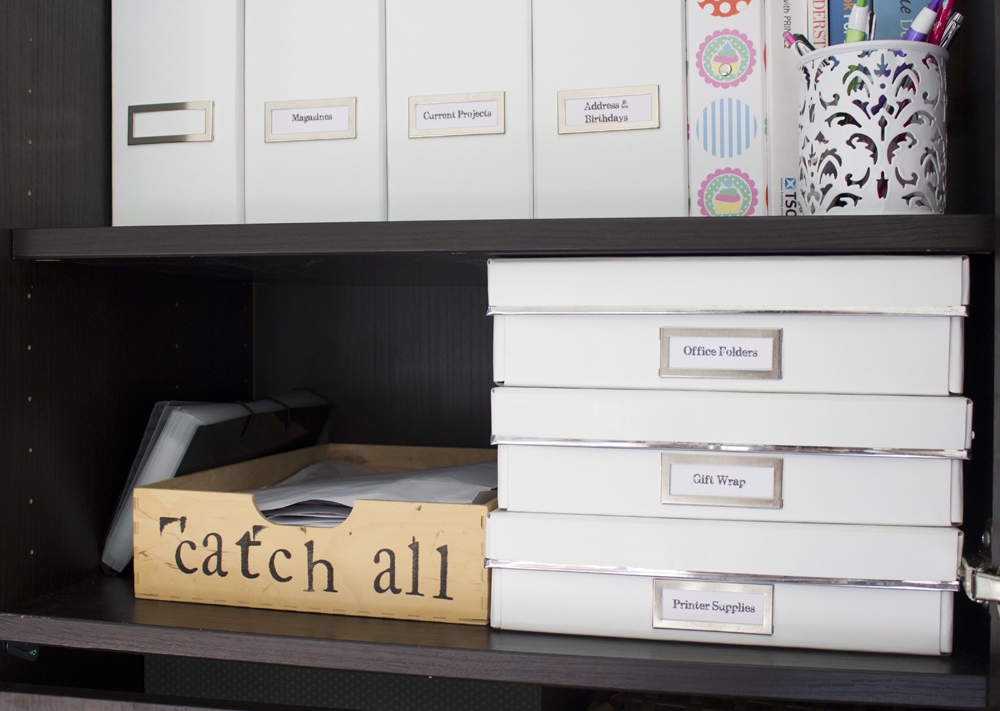

Okay, so here's the bottom shelf. The "catch all" box is where we throw all those things that you can't be bothered to deal with straight away. Previously everything used to land in two wicker baskets on the open shelving. That was okay, but it was too out in the open. I really need to keep that kind of thing hidden away. No one wants to be confronted by a display of take away menus, till receipts and wires when they come visiting. 


See? No one needs to be seeing that.


As you can see I am not too good at stamping, but I put the wording on here myself none the less. I am telling myself I kinda like the crazy, splodged look... 

The black folder you can see behind the box is where I keep receipts. I dump them all in here out of my purse and out of the catch-all box every now and again. Then periodically I will go through and throw away all the ones I no longer need. Neat!


Lastly, but by no means least. Here is where I keep my spare office folders (punched pockets, presentation folders, etc), my gift wrap supplies (sheet wrap, tags, tissue paper) and my printer supplies (ink, sheet labels, paper). 

And that concludes the tour of our shiny new hidden home office space. I know it's compact, but it works for us right now. 


And because i like em, here's a before and after...


Thanks so much for visiting me! 

I've linked up to these super parties:

Becolorful Sumo's Sweet Stuff My Uncommon Slice of Suburbia
Organize and Decorate Everything shabby creek cottageThe Shabby Nest

Making the World Cuter - Monday Link Up Party
Debbiedoos - Power of Pinterest Party
We Are That Family - Works For Me Wednesdays
New Nostalgia - Anti Procrastination Tuesdays
A Bowl Full Of Lemons - One Project at a Time
Adorned From Above - Wednesdays Link Party
The Artsygirl Connection - Pinspirational Thursdays
Between U & Me - Crazy Cute Link Party
30 Handmade Days - Friday Pity Party
Chic on a Shoestring Decorating - Flaunt It Friday
French Country Cottage - Feathered Nest Friday
It's a Hodgepodge Life - Hodgepodge Friday
It's Overflowing - Overflowing With Creativity
Positively Splendid - Saturday Seven Party
Too Much Time - Get Schooled Saturday
Lovely Crafty Home - Lovely Crafty Weekend
Funky Junk Interiors - SNS

Thursday, 8 November 2012

Storage Problem - We Have Too Much Of It!!


I know what you're thinking... How can a family of four possibly have too much storage?! Well, it is an integral part of my nature to be pragmatic. Especially when buying furniture. That's why I love Ikea so much! It's cheap, because what's the point in spending lots of money on beautiful furniture pieces that will likely end up crayoned on? But, I also like it because the furniture is so functional. I never buy anything without first considering how much stuff we can hide in it.

Because of this, I have ended up with lots of empty drawers in the living room. Storage in the living room presents a problem anyway, as I can only store things here which are child friendly. My kids are old enough now that I leave them playing in the living room while I cook in the kitchen next door or run some laundry upstairs. We all know how little time it takes for kids to wreak havoc on some fun new "toy" they just found.


I'd really like to store my wrapping and parcel papers in the long drawers of this bureau. Those little drawers would be perfect for pens and tape, and the drop-down section could hold stationery, cards, and things. Can you imagine the fun the kids would have with that?! For now, one drawer keeps our fleece blankets and throws neat, because although it is irritating to have to fold blankets several times a day it's a better option than trying to re-roll paper onto a dented telescope.. erm... megaphone... erm... paper roll.


The wicker baskets in this IKEA Expedit would hold lots of things, but the kids frequently go in there and pull out their contents. So, for now, they just hold bibs, scruffs, mopping up towels and hats and scarves. Half of them are empty and a couple only have one or two things in there.


Expedit number two holds some of the kids' toys. We used to have all their toys in the living room, but we changed that for our sanity. I'll talk about that later.


Lastly, we have the "Big Unit". My relationship with Big Unit is a love/hate one. I love that we can store things up high out of the children's reach and I love that no one can see what clutter lies behind those doors until they open them. I hate it because it is massive and dark and takes over the room. It's also a clutter attractamatron. Everything gets put here. I am working on a solution to that though, which I am pretty excited about.

So my mission of the moment is to streamline the things we have in these cupboards already - I am sure there is a TON that can be relocated or thrown away. Then I will work on finding childproof items to store here which will free up space elsewhere. It may not be ergonomically ideal, but I guess you have to make concessions when you have young kids.

Thanks for reading and please feel free to let me know what you store in your family living room.

I linked up to Furniture Feature Friday

Tuesday, 6 November 2012

Master Bedroom Makeover


You know, I have been giving myself an altogether hard time thinking about what I haven't been doing to get this house of ours organised. The other day I sat here and read my previous blog entries and looked at the photos and do you know what? I have been busy! I've done loads!

This year has been a hugely busy one with my husband being made redundant and then going self-employed. We were going to move for a job for him and then we decided not to. We have also aaaaaalmost finished an investment property we bought and that was a massive project to tackle and something we've never done before. Oh, and not forgetting the care of our two kiddos of course! So yeah, I need to stop being so hard on myself. I am trying really hard and actually achieving a lot. It's just not everything... Yet.

So anyhoo! I have our master bedroom redo to show you and I love how it turned out. First of all, I will show you the before photos.


We kept all the same furniture, but just changed up the soft furnishings and repainted. I moved the bed to the opposite wall too. It sits much better over that side I think. The paint is Dulux - Perfectly Taupe. I will have to control myself in order to NOT paint the rest of the house this colour!!


I love our massive bed. It's an Ikea king size, so it's really huge. It does mean that I am limited in my furniture arrangement, even though our bedroom is pretty big for a British house. However, the sacrifice is worth it for the comfort and wriggle room during sleep time.


We also had the ceiling re-boarded then replastered and cornicing added. All the ceilings upstairs were pine-clad boards and absolutely vile. Underneath we found they were all woodchip, so we just had to re-board and plaster rather than just skim. This was the last room that needed this done, so that's a job completely ticked off the list. We couldn't afford to do every ceiling at once, so we've been doing them as we redecorated each space.


These ginormous Ikea Pax wardrobes took over the whole length of one wall. I posted about them on here before.


I decluttered the inside of them so that I could get rid of the unit on the end. It really opens the room up, and you no longer have to breath in when you come through the door!


More or less everything is from Ikea. I adore the place! The bedding, knitted throw, and curtains are from there and most of the furniture with a couple of exceptions I'll show you.


The chest of drawers was actually left in our first house by the previous owners. We even found old 70's photos of a woman sunbathing topless hidden underneath the drawer lining!! I thought about painting it, but I wanted some wood finish in here to bring some warmth into the room. I don't like the handles, which aren't the original ones. I put cheapo Ikea handles on a few years ago and they just don't go. I will buy some to match the wardrobe handles when I next do an Ikea run.

I also want to put something on this blank wall... Maybe frame some of the yellow fabric I have used as an accent. Or maybe some old plates or something. Don't know yet.


Here's a close up of the dresser top. I used a lovely yellow fabric laid underneath a piece of glass I had cut. It's a lot cleaner and easier to wipe down when I get makeup on there.

Check out these cute little ceramic hearts...

 Love them! :)

Oh, and I needed something to go with the drawers, so I picked up this old chair at a charity shop for only £5. It was really easy to recover the seat pad using the same yellow fabric from the top of the drawers.


Well, that's all! Like I said, there are still some finishing touches to be made, but on the whole, I'm really pleased! Here's a recap...


I've linked up to...

TDC Before and After DIY Show OffBecolorful My Uncommon Slice of SuburbiaSomewhat SimpleKatie's Nesting SpotThe Shabby NestThirty Handmade Days
Tatertots n Jello - Weekend Wrap Up
The Shabby Creek Cottage - Transformation Thursday
Adorned From Above
Chic on a Shoestring - Flaunt It Friday
French Country Cottage - Feathered Nest Friday
Simply Designing - Friday Link Party
Organise & Decorate Everything - Home Decor & Organising Link Party
Skip To My Lou - Made By You Mondays
Sumo's Sweet Stuff - Market Yourself Monday
My Romantic Home - Show & Tell Friday
It's a Hadgepodge Life - It's a Hodgepodge Friday
Funky Junk - SNS
Be Different, Act Normal - Show and Tell Saturday
Too Much Time - Get Schooled Saturday
Positively Splendid - Saturday Seven
I Heart Naptime - Sundae Scoop Link Party
Debbiedoos - Newbies Party

Thursday, 1 November 2012

Drying Laundry Indoors & Dehumidifiers


We all know that when it gets to this time of year our houses can't help but become more humid. We dry clothes indoors on clothes horses and radiators and all the while keep our windows closed to conserve heat. This leads to visible condensation on walls and windows and a growth in that icky black mold.

Having a family means that we do a lot of laundry. Like maybe 15+ loads per week. You can imagine the amount of water that 15 loads of washing might give off. Or can you...? Based on how frequently I empty our dehumidifier I guessed that we might get one litre for every 2/3 loads.


This is our trusty electric dehumidifier. We got it from amazon and it's this one: De'Longhi DEM10 Compact Dehumidifier. This photo shows it's empty, but the container holds two litres of water.


Here's my one load of washing.

I left the dehumidifier on for a total of 6 hours. It was on four hours in the evening, then turned off overnight and I put it on for two hours the next morning. The washing was pretty much dry by that point. What I usually do is put anything that's a bit damp still or feels a bit cold onto the radiators for a bit just to finish it off. Or if it's something that needs ironing usually the iron takes the cold off it anyway. 

You are probably thinking that 6 hours is a long time, but don't forget that I usually have two loads of drying together. I'm not sure whether the liquid is pulled out of the air faster, maybe not but it doesn't take twice the time to dry. I know that much. Also, when not using a dehumidifier I have had laundry sitting on clothes horses for DAYS without drying completely.  

I wanted to know how energy efficient these machines are and whether using one is cheaper than drying in a tumble drier. From my internet research (thank you Google!) I have learned that this machine will use only 0.35 KWh. A tumble dryer uses 3 KWh, which equates to about 30-40p per hour. 

Now, this requires a bit of maths, so excuse me while I make a cup of tea...

Okay. Better. To completely dry a load of washing in a tumble drier let's say it takes an hour. It doesn't for ours, because the drier only holds about half a wash load, but for simplicity's sake, lets assume it takes the whole load and dries it in an hour. Let's also assume that it is safe to dry everything you wash in the tumble drier. That would cost 40p on the topside. 

If each load of washing takes 6 hours of dehumidifier time we can work out that it would cost a total of... 28p. Or thereabouts. I think. 


It's not a huge difference, granted. BUT, you can dry everything in one go without risking shrinkage. Plus, the cost isn't the main reason we use one. We could dry everything indoors without a dehumidifier, but it would take a lot longer and we would have loads and loads of condensation.

The photo above shows the result of those 6 hours dehumidifying. My inner geek wanted to know exactly how much liquid was sucked out of my office where the clothes were drying and so I took the water and measured it. A total of... ::drumroll:: 3 3/4 pints or 900ml. Gasp! I guess I was way off in my estimate of 1 liter per 2 or 3 loads.

Can you imagine if all that liquid was just floating about in the air each week? At 15 loads we could have over 13 litres (7 gallons) of water per week being let into the air in our home. Clinging to our windows and walls and causing that horrid black mold!


It's actually a really simple set up too. The clothes horses are kept in the office, which makes the enclosed space easier for the dehumidifier to work in. The description says it's good for an area of up to 45m2, so great for most average sized rooms I would imagine.

And, as if that wasn't enough to sell it to you, you can keep the water you get out to use in your iron! It's demineralised so you won't get limescale. :)

Let me know how you dry your clothes at this time of year! Do you use one of these? Or something better?
Related Posts Plugin for WordPress, Blogger...