Tuesday, 6 November 2012

Master Bedroom Makeover


You know, I have been giving myself an altogether hard time thinking about what I haven't been doing to get this house of ours organised. The other day I sat here and read my previous blog entries and looked at the photos and do you know what? I have been busy! I've done loads!

This year has been a hugely busy one with my husband being made redundant and then going self-employed. We were going to move for a job for him and then we decided not to. We have also aaaaaalmost finished an investment property we bought and that was a massive project to tackle and something we've never done before. Oh, and not forgetting the care of our two kiddos of course! So yeah, I need to stop being so hard on myself. I am trying really hard and actually achieving a lot. It's just not everything... Yet.

So anyhoo! I have our master bedroom redo to show you and I love how it turned out. First of all, I will show you the before photos.


We kept all the same furniture, but just changed up the soft furnishings and repainted. I moved the bed to the opposite wall too. It sits much better over that side I think. The paint is Dulux - Perfectly Taupe. I will have to control myself in order to NOT paint the rest of the house this colour!!


I love our massive bed. It's an Ikea king size, so it's really huge. It does mean that I am limited in my furniture arrangement, even though our bedroom is pretty big for a British house. However, the sacrifice is worth it for the comfort and wriggle room during sleep time.


We also had the ceiling re-boarded then replastered and cornicing added. All the ceilings upstairs were pine-clad boards and absolutely vile. Underneath we found they were all woodchip, so we just had to re-board and plaster rather than just skim. This was the last room that needed this done, so that's a job completely ticked off the list. We couldn't afford to do every ceiling at once, so we've been doing them as we redecorated each space.


These ginormous Ikea Pax wardrobes took over the whole length of one wall. I posted about them on here before.


I decluttered the inside of them so that I could get rid of the unit on the end. It really opens the room up, and you no longer have to breath in when you come through the door!


More or less everything is from Ikea. I adore the place! The bedding, knitted throw, and curtains are from there and most of the furniture with a couple of exceptions I'll show you.


The chest of drawers was actually left in our first house by the previous owners. We even found old 70's photos of a woman sunbathing topless hidden underneath the drawer lining!! I thought about painting it, but I wanted some wood finish in here to bring some warmth into the room. I don't like the handles, which aren't the original ones. I put cheapo Ikea handles on a few years ago and they just don't go. I will buy some to match the wardrobe handles when I next do an Ikea run.

I also want to put something on this blank wall... Maybe frame some of the yellow fabric I have used as an accent. Or maybe some old plates or something. Don't know yet.


Here's a close up of the dresser top. I used a lovely yellow fabric laid underneath a piece of glass I had cut. It's a lot cleaner and easier to wipe down when I get makeup on there.

Check out these cute little ceramic hearts...

 Love them! :)

Oh, and I needed something to go with the drawers, so I picked up this old chair at a charity shop for only £5. It was really easy to recover the seat pad using the same yellow fabric from the top of the drawers.


Well, that's all! Like I said, there are still some finishing touches to be made, but on the whole, I'm really pleased! Here's a recap...


I've linked up to...

TDC Before and After DIY Show OffBecolorful My Uncommon Slice of SuburbiaSomewhat SimpleKatie's Nesting SpotThe Shabby NestThirty Handmade Days
Tatertots n Jello - Weekend Wrap Up
The Shabby Creek Cottage - Transformation Thursday
Adorned From Above
Chic on a Shoestring - Flaunt It Friday
French Country Cottage - Feathered Nest Friday
Simply Designing - Friday Link Party
Organise & Decorate Everything - Home Decor & Organising Link Party
Skip To My Lou - Made By You Mondays
Sumo's Sweet Stuff - Market Yourself Monday
My Romantic Home - Show & Tell Friday
It's a Hadgepodge Life - It's a Hodgepodge Friday
Funky Junk - SNS
Be Different, Act Normal - Show and Tell Saturday
Too Much Time - Get Schooled Saturday
Positively Splendid - Saturday Seven
I Heart Naptime - Sundae Scoop Link Party
Debbiedoos - Newbies Party

Thursday, 1 November 2012

Drying Laundry Indoors & Dehumidifiers


We all know that when it gets to this time of year our houses can't help but become more humid. We dry clothes indoors on clothes horses and radiators and all the while keep our windows closed to conserve heat. This leads to visible condensation on walls and windows and a growth in that icky black mold.

Having a family means that we do a lot of laundry. Like maybe 15+ loads per week. You can imagine the amount of water that 15 loads of washing might give off. Or can you...? Based on how frequently I empty our dehumidifier I guessed that we might get one litre for every 2/3 loads.


This is our trusty electric dehumidifier. We got it from amazon and it's this one: De'Longhi DEM10 Compact Dehumidifier. This photo shows it's empty, but the container holds two litres of water.


Here's my one load of washing.

I left the dehumidifier on for a total of 6 hours. It was on four hours in the evening, then turned off overnight and I put it on for two hours the next morning. The washing was pretty much dry by that point. What I usually do is put anything that's a bit damp still or feels a bit cold onto the radiators for a bit just to finish it off. Or if it's something that needs ironing usually the iron takes the cold off it anyway. 

You are probably thinking that 6 hours is a long time, but don't forget that I usually have two loads of drying together. I'm not sure whether the liquid is pulled out of the air faster, maybe not but it doesn't take twice the time to dry. I know that much. Also, when not using a dehumidifier I have had laundry sitting on clothes horses for DAYS without drying completely.  

I wanted to know how energy efficient these machines are and whether using one is cheaper than drying in a tumble drier. From my internet research (thank you Google!) I have learned that this machine will use only 0.35 KWh. A tumble dryer uses 3 KWh, which equates to about 30-40p per hour. 

Now, this requires a bit of maths, so excuse me while I make a cup of tea...

Okay. Better. To completely dry a load of washing in a tumble drier let's say it takes an hour. It doesn't for ours, because the drier only holds about half a wash load, but for simplicity's sake, lets assume it takes the whole load and dries it in an hour. Let's also assume that it is safe to dry everything you wash in the tumble drier. That would cost 40p on the topside. 

If each load of washing takes 6 hours of dehumidifier time we can work out that it would cost a total of... 28p. Or thereabouts. I think. 


It's not a huge difference, granted. BUT, you can dry everything in one go without risking shrinkage. Plus, the cost isn't the main reason we use one. We could dry everything indoors without a dehumidifier, but it would take a lot longer and we would have loads and loads of condensation.

The photo above shows the result of those 6 hours dehumidifying. My inner geek wanted to know exactly how much liquid was sucked out of my office where the clothes were drying and so I took the water and measured it. A total of... ::drumroll:: 3 3/4 pints or 900ml. Gasp! I guess I was way off in my estimate of 1 liter per 2 or 3 loads.

Can you imagine if all that liquid was just floating about in the air each week? At 15 loads we could have over 13 litres (7 gallons) of water per week being let into the air in our home. Clinging to our windows and walls and causing that horrid black mold!


It's actually a really simple set up too. The clothes horses are kept in the office, which makes the enclosed space easier for the dehumidifier to work in. The description says it's good for an area of up to 45m2, so great for most average sized rooms I would imagine.

And, as if that wasn't enough to sell it to you, you can keep the water you get out to use in your iron! It's demineralised so you won't get limescale. :)

Let me know how you dry your clothes at this time of year! Do you use one of these? Or something better?

Saturday, 20 October 2012

Pinterest Kids Activity - Tested. Cloud Dough.


So, anyone with Pinterest fetish - like me - will have tons of things they have pinned and fully intend to actually DO later. I have zillions. There are some really cool looking kids activities on there and I gave up pinning them a while ago because I already had so many that I hadn't attempted yet.

One that stuck in my mind (mainly because I already had an out of date bag of flour and some baby oil) was the "Cloud Dough" one. Apparently, this cloud dough is meant to be, "A wonderful sensory activity for children."

"Fair enough." I thought, "Let's have a bash!"


I made the executive decision to mix the ingredients myself. You never know how these things are going to turn out and I didn't want the kids to feel an invested interest at the point before I have to tell them it's a sticky mess that needs to be thrown away. I could imagine their heartbroken faces.


So this is what it looks like. It does indeed feel like flour and it does indeed have moulding potential.


When the kids play I basically just leave them to it. I gave up trying to get them to play in a controlled manner a long time ago. They are happiest when left to their own devices with me working on my own little bit of the activity alongside them.


I think they enjoyed it. I built a few walls and made a few cup "sandcastles" but to be honest, it has its limits.


Youngest ate it. Let's face it, the kid eats anything. He sits on a beach chowing down on sand like he's at an all you can eat breakfast buffet. So flour and baby oil? Gourmet!


Now. When looking at a new kids' activity I usually want to know these three things.
How long does it take to set up?
How long do the kids actually play with it?
How long does it take to clean it up afterwards?

Basically, the middle item is a gauge of enjoyment. The longer the kids play, I figure the more they are enjoying themselves. The other two have to balance with this to make it worth it.


Well, let's just say that things didn't quite balance out right for this Pinterest activity. It took me about 5 minutes to set it up. Not bad. The kids played for 15 minutes. Hmmm, not so great. Especially when you consider that they had started getting bored by around the 7-minute mark. It didn't take long for them to spread out the mess. You can tell when boredom sets in by the way they begin to push the boundaries of what they know to be the proper, acceptable way to play with the toy or activity.


By 15 minutes they had given up on it and wandered into the living room leaving a white trail of cloud dough footprints (which are considerably less fluffy than the name suggests). They asked me to put the TV on.

It took me 30 minutes to sweep up and wipe down afterwards. It was all over the kids' faces, clothes, the floor, the walls, chairs, table, living room carpet... And in case you're thinking, "Hey, look she put down the hoover and staged a photo with it next to the footprints!" No. Our hoover actually lives right there. In the living room. I hoover that often - through actual necessity - that the hoover remains within easy reach at all times.

Let's do the maths... 5 minutes set up plus 30 minutes clearing up = 35 minutes of non-fun mummy prep and tidy time next to the 15 minutes of actual playtime. Hmmmm.... I don't think we will be doing this one again until the summer. Then they can do it outside. But, then again. I think I will just get them a bag of sand.

Tuesday, 6 December 2011

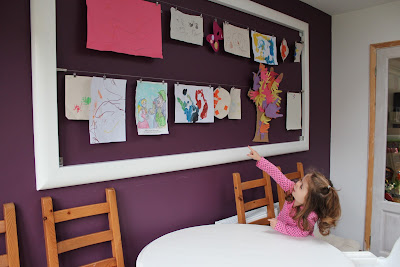
My Kids Art Wall

Well, I know this has been a long time in the making, but I am finally able to post something here and it's something that I am head to toe proud of! You know that thing where you form an idea inside your mind's eye that you just know has a good chance of being impossible (or too expensive) to create? Well, I did that with this.


Remember the big purple wall in the kitchen? It had two frames up there as a "put me on" but I always envisioned it being a space where we could hang all the kids' art. Our appliances are all integrated, including the fridge, so all their pictures were being stuck to the extractor hood above the hob and it just looked a mess. Plus you couldn't see anything!

So, a bit of imagination, a huge load of luck, that trip to IKEA plus a couple of coats of paint and...


Huzzah!! I am so so so so pleased with it! The frame was a complete chance buy from eBay. I won it for the grand total of £1.04 and only had to pick it up from a nearby town. YEY! It was stained pine, but I painted it cause I prefer white.


The wires with the clips are from IKEA and they're called Deka. They're meant for curtains, but I've seen tons of bloggers use them for clipping up pictures and photos, etc, so I can't take credit for that idea.


Had to rope in the hubby to do the hanging part, but this is a really sturdy external wall, so there are no fears about it not being able to hold the weight. Most other walls in the house are super flimsy partition wall types.

I know that I caved again to my "GET THE BIGGEST ONE YOU CAN FIND" instinct, but I think in this case it paid off. I love love love my children's new gallery space and they love it too!


Linking up to.....

The DIY Show Off
 

Design Dazzle
Savvy Southern Style - Wow Us Wednesdays

Org Junkie's 52 Weeks of Organising

Wednesday, 9 November 2011

Monster Themed First Birthday Party!


I know I know! Youngest's birthday was over a month ago and I am only just writing about it here. My Mum has kindly chided me into updating my blog, so here I am. Thanks, Mum! :)


Youngest's birthday was lovely and he was lucky enough to have TWO parties to celebrate turning 1. The first party was on the day of his birthday and his friends and their mummies all came along.

I made a special Monster Cake, Monster party bags, Monster googly eye cups, and a Monster happy birthday banner.


The cake was yummy, even if I do say so myself and the inside was all multicoloured and Monstery. :)


The kids seemed to have fun running about, playing with toys, making a mess and eating their party food.


We all sang Happy Birthday to the little Mister...


 And the birthday boy really, really loved the cake!


Once everyone had gone the house was in a spot of disarray.


But I wasn't worried as I had Eldest on hand to help clean up!


Related Posts Plugin for WordPress, Blogger...